Method Credit: c0o1, Deadcode
This mission is hard to untangle, with tons of possibilities, and I think it's the one I've had to spend the most time on. So first off, which worm should you choose, assuming you only need one? Both routes are similar in that you're handcuffed for a few turns by the delay on ropes, and you can manage to pick off worms with short turns while you wait. But having spent tons of time on each worm, I can safely say the left worm route gives a faster round time. It's instantly open, offers a triple-ish kill, and is really close to the left two worms that you need to hunt down. I've attached a replay of the luckiest right worm route I've seen, and it's about the same as an average left worm route. The other replays are variations you'll see on the main route.
Turn 1: Select your left worm. Now interestingly, this is the only jump in the missions that requires sub-pixel alignment to do properly, and Team17 probably wanted to make it impossible. If you try to put yourself in the exact same spot just by eyeballing it, you still won't make the jump every time. But I found a really simple combination of moves that gets you into the same position and over the jump every time:
1 nudge right, 1 nudge left, forward jump, backflip, one nudge left, then backflip.Now for a max bounce, full power, 3s ground nade that gets a triple-ish kill every time: the worm position is pretty exact. My method is
jumping onto the hook as shown, falling down, aligning my aim by looking at the crosshair on the ground, and backjumping 3 times. Sadly I can't find any good natural landmarks on the map to get to this position faster, no matter where I look. I also can't find other positions that are close and still work: going left a bit does give one position, but it doesn't always manipulate the 3rd worm into walking down to its watery death. In any case, I'd memorize how this crosshair looks on the land: the upper right region has a single line of dark green sandwiched between medium green.
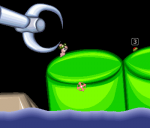
End your turn above the gray hook, facing right to prepare for a backflip onto a long girder.
AI Turn 1: The right AI always nades or zooks the right worm, then walks right, giving you the honor of a triple-ish kill, over the course of a couple turns.
Turn 2: Now this turn requires some explanation: why use a girder when you could find some other crazy move to kill the worm above you? It's because A) this girder serves to get you a super quick kill with bat next turn, B) staying high makes the far left worm much more likely to zook open a hole in its hiding spot, and C) it's really hard to find a move to kill that also has low preparation time. Homing is imprecise, a 1 or 2 notch nade needs to be lined up just right, etc. On top of all this, you essentially have 1 turn to burn while waiting for ropes, so you might as well make that turn fast. If you did kill this worm instead of girdering, there would likely be nothing for you to do next turn, unless the highest worm teleports within reach. Plus you'd be in a spot where the far left worm doesn't open.
So, just make a long girder to the upper AI worm and walk up about as far as you can. So far, I've had more luck ending my turn on the girder instead of getting to the left of the AI worm. This seems to result in more crate hits in the AI's coming turn, if it zooks.
AI Turn 2: There are 4 main possibilities the highest AI worm might take here, in rough order of greatest likelihood:
A) Walks right, skips go.
B) Zooks, hitting crate, opening and hurting itself. Zooking seems to occur most often with full red wind.
C) Zooks, missing crate, then walks right as well, albeit not as far as in case A.
D) Teleports to a semi-random location.
Turn 3: Unless the AI has just teleported to an amazing, close spot where you can get a double kill with say, bow or shotgun, just do a very quick, horizontal bat of the worm on the orange object. Don't bat instantly with f7 though, or you'll get a downward angle. Stay high on the girder to manipulate the AI into zooking higher and opening.
AI Turn 3: The far left AI should now zook and open; it's very rare that it doesn't. It may collect the health crate, or just stand near it; there also may be a way to manipulate this with your worm's position. The upper AI worm may get damaged and fall, or stay roughly where it is, assuming it hasn't teleported.
Turn 4: Now you have two worms to take out, and it's best to formulate a plan to kill 1 per turn, while staying very safe. Most of the time, it's safest/more useful to take out the far left worm first. Rope and nade is my preferred method, aiming to get the worm down the hole. The placement is usually a bit right of the worm, but if you miss, you may still have a chance with bow next turn. Be extremely cautious about your hide; if it's theoretically possible to kill you, the AI may actually discover it, because they do some brute force searching for shots. A great unkillable hide is on the pinkish object up left, it's usually my go-to spot.
AI Turn 4: Now the final AI worm will presumably take a shot at you, unless it's teleported to a distant spot. Also worth noting, if the AI are in danger of sinking, they tend to teleport.
Turn 5: Think hard about the absolute safest way to kill the final worm; if it can be pinned down, and has under 100 health, minigun might be ideal. If it remains in its same upper hide spot, bow is a good option, aiming for the same hole as the previous worm. Looking at some of the variations here might help.
 Forums
