Method Credit: Lex
Strategy-wise, this run requires setting things up to pick off one worm each turn, and get one double kill. Which seems to be as efficient as we can get, since the worms are very isolated. And as with most missions, fewer turns generally means lower overall round time. Start by using alt f4 + space to get to the 2nd attempt. I'm going to call the AI Worm 1 to Worm 7, as they appear from right to left.
Turn 1: Use rope to quickly grab the dyna crate, then dragon ball Worm 1 into the drink. Try to end your turn as far right as possible. Your worm acts as bait: it will draw air strike fire from Worm 6, who would normally attack your far left worm, which could kill it and ruin the run. Also, your first worm dying will be good for turn order on your last turn.
Turn 2: Use rope to set off the mine, do one swing backward, then come forward and land where the mine was. Since the mine damaged Worm 3, you have around .2 secs of walking after you land before you're interrupted by damage animation. To avoid this, try to land in a spot where you can fire punch Worm 2 without moving. If you miss that spot, try to jump immediately then fire punch. You want to end your turn as far left as you can, since you'll be in prime double kill position later.
Turn 3: Worm 7 will have lobbed a nade at your far left worm; sometimes this kills, and if this happens, you really just have to restart. If not, then with your third worm, just kill Worm 6. Fire punch is the fastest way, but it takes some practice to hit and then land without taking fall damage. You want to be just a bit right of being horizontally lined up with Worm 6. If you want to stay safe, just use shotgun to kill.
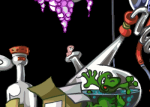
As for the retreat, I think this is the best position I've found (from the airstrike luck run), standing with the end of your tail in line with the bottom of the red thing:

This position manipulates Worm 5 into walking right, closer to the mines, which I assume it does to distance itself from your worm, and possibly to give it a better position for firing on your far left worm. The point is to get Worm 4 to air strike you, barely hitting Worm 5 into the mines. Now this position doesn't have a lot of margin for error. If you go much further right, Worm 5 will nade at your worm, possibly pushing you into a location where Worm 4 won't hit Worm 5 with the air strike. E.g. pushing you left onto the grey tube.
Turn 4: Now with your far left worm, rope up and bat Worm 7. Bat has a long hitbox, so you can get pretty far away, which helps for the retreat. And the retreat is the crucial component here for the aforementioned air strike. Next turn, normally Worm 4 targets your left worm. But if you end your retreat roughly where I do, Worm 4 instead walks right and targets your middle worm every time. I don't know exactly what causes the AI to change targets like this, it may have something to do with how 'unhittable' your worm is in this spot. In any case, small changes to your worm position can sometimes result in the AI switching targets. A good way to land in this spot is just jumping when you're in the middle of the whiter part of the glass:
 Turn 5
: Now if you were lucky, Worm 4's airstrike will have hit and killed Worm 5; as far as I know, there's some luck here in exactly where it aims. I've included the case where this does and doesn't happen. In either case, with your 2nd worm, just lay the dyna immediately to kill Worm 3 and Worm 4. This is where manipulating Worm 4 to walk right pays off.
Turn 6: If Worm 5's still alive, try to make sure you spent the AI's turn planning how to kill it. Rope to it quickly. If the worm hasn't moved, fire punch will kill in either of the two main positions it might take, which is a quick way to attack. Minigun is also a good option, if it's pressed up against land.
 Forums
 Author
Topic: Mission 11 - Chemical Warfare (Read 1164 times)
Author
Topic: Mission 11 - Chemical Warfare (Read 1164 times)